Monday, August 15, 2011

A Fashion Illustration, Before and After

The treatments are finished!  This is the fifth in a 12-part series on selected conservation treatments of artwork and photographs.  "Preserving a Family Collection" concludes on September 1.

Fashion illustration by June Anderson receiving surface cleaning with
grated erasers.
As part of its mission the Conservation Center for Art and Historic Artifacts offers opportunities for post-graduate study in paper conservation.  “Post-graduate” is the key term here.  The fellowship program at the Center is for professional conservators, graduates of some of the best programs in the world, at the very beginning of their careers.


Marion Verborg, who performed the conservation treatments described during this past week, is bound for conservation greatness.  She received her Master’s degree in Conservation of Cultural Property, with an emphasis in graphic arts, from Pantheon-Sorbonne University, Paris.  She’s held paper conservation internships at the Philadelphia Museum of Art, the Albertina Museum (Vienna, Austria), the Picasso Foundation (Malaga, Spain) and the Deutsches Historisches Museum (Berlin, Germany).  This month, she concludes her year-long fellowship at the Conservation Center, jets out to an International Association of Book and Paper Conservators conference in Berne, Switzerland to present a paper on light bleaching, then returns to the States to embark on her next fellowship at the Straus Center for Conservation and Technical Studies at the Harvard Art Museums.

And we wish her the best!

A detail of the fashion
illustration.
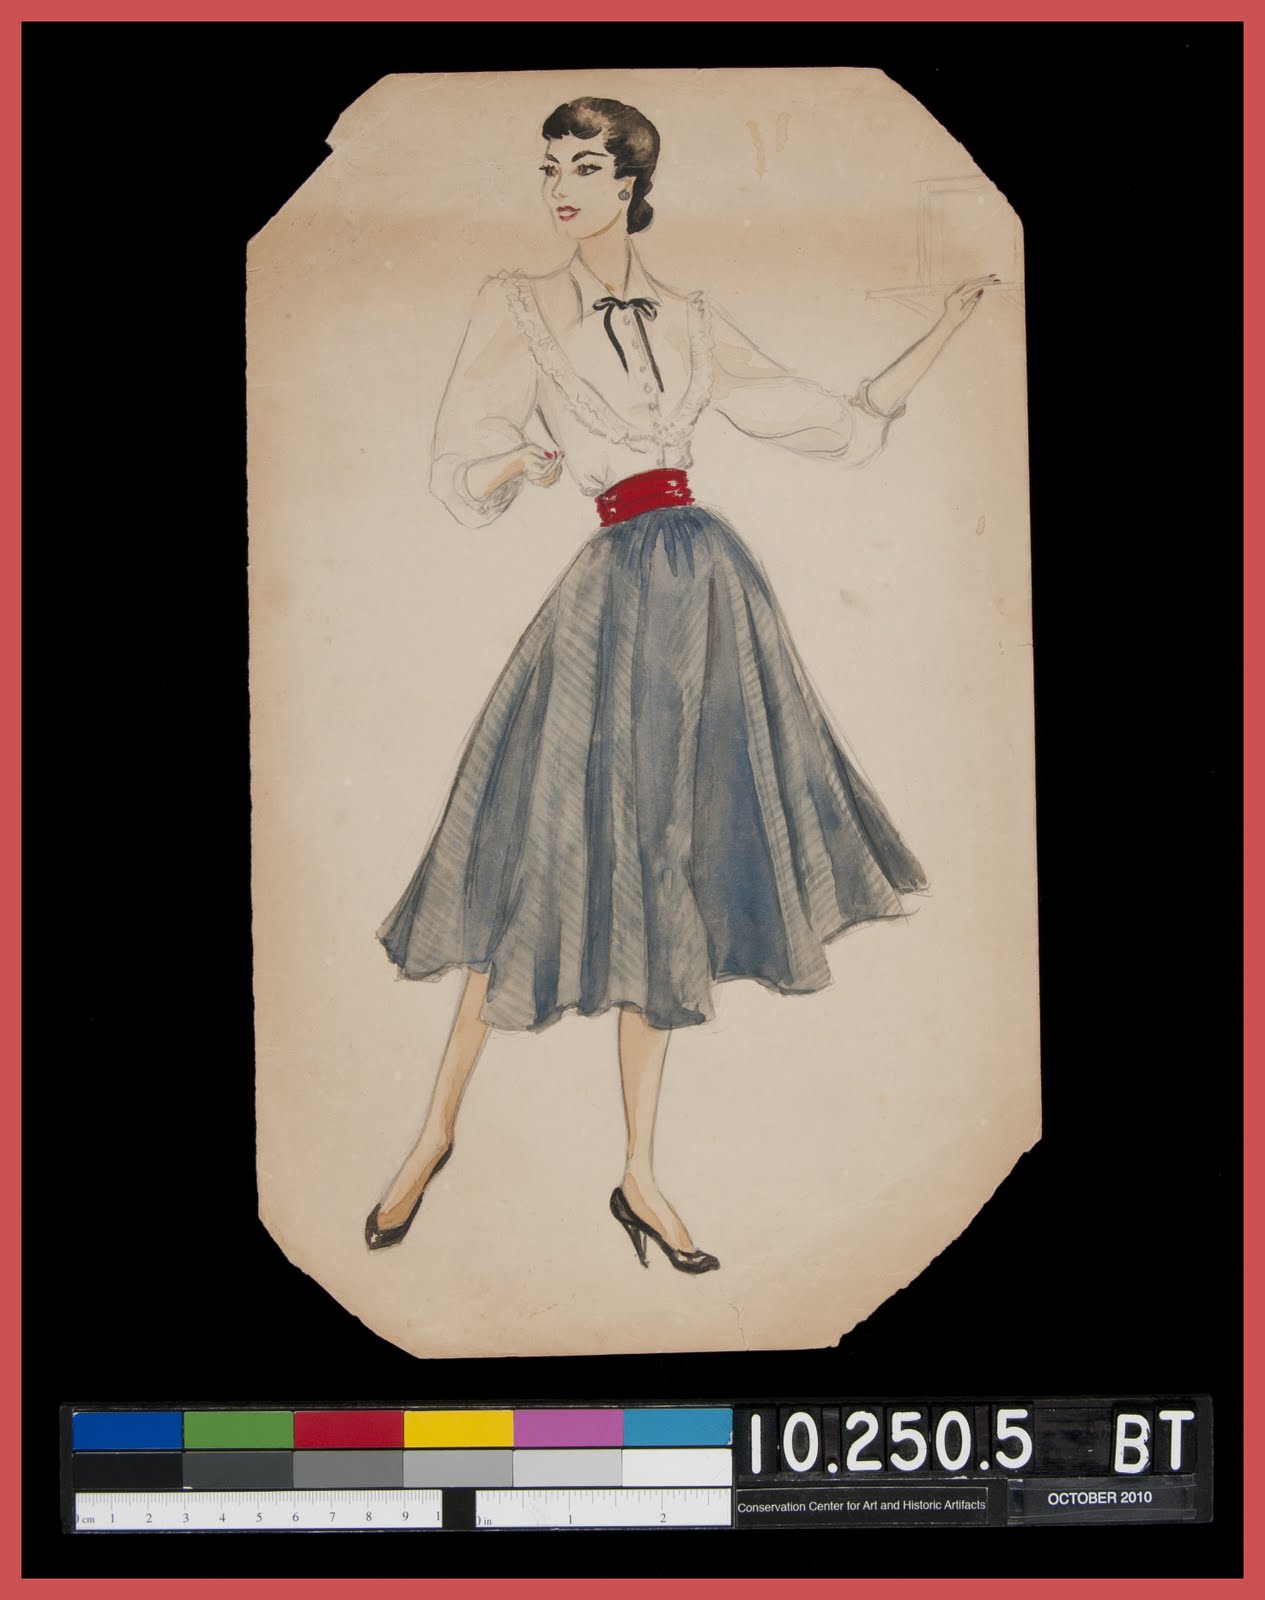
As she was preparing to leave, I asked Marion which was her favorite of the treatments and this was her choice – one of my mother’s homework assignments from the Traphagen School of Fashion.  “I love this woman in the dress,” she said.  “It’s a lovely fashion illustration.”

For this treatment, Marion surface cleaned the artwork with grated erasers and a soft brush, washed it on blotters, repaired the tears, and finished with humidification and flattening.  She did beautiful work.  Harvard’s lucky to get her!


Fashion illustration by June Anderson, before treatment.

Fashion illustration by June Anderson, after treatment.

© 2011 Lee Price

Friday, August 12, 2011

Drawing of a Dog, Before and After

The treatments are finished!  This is the fourth in a 12-part series on selected conservation treatments of artwork and photographs.  "Preserving a Family Collection" concludes on August 31.

I love this photo of a treatment in progress.  I call it “Washing the Dog.”


This dog – and another dog that my father painted – were just neighborhood dogs.  My father didn’t grow up with a pet dog of his own and didn’t own one until he was in his forties, when our family brought home a Saint Bernard puppy.

As a dog enthusiast, I like this picture a lot.  It captures a certain doggie dignity that’s very appealing. 

Or maybe he’s just begging...

Marion Verborg, 2010-2011 N.E.A. Fellow at the Conservation Center for Art and Historic Artifacts, treated this pencil drawing.  She surface cleaned it, washed it in calcium-enriched deionized water, mended some tears and losses with Japanese paper, and humidified and flattened it.

Note the three dark areas along the right edge of the paper in that “Washing the Dog” picture.  These areas surrounded small holes that were torn into the paper in order to place it into a three-ring binder.  Following the bath and Marion’s mends to the back of the paper with Japanese paper, the old damage to the paper is barely visible at all.


Drawing of a dog by Art Price, before treatment.

Drawing of a dog by Art Price, after treatment.

© 2011 Lee Price

Wednesday, August 10, 2011

The Card Game, Before and After

The treatments are finished!  This is the third in a 12-part series on selected conservation treatments of artwork and photographs.  "Preserving a Family Collection" concludes on August 31.

The Fight by Art Price.


My father witnessed
a fight aboard ship
while serving in the
Navy (1944-1947). 


He attempted
to capture
it twice,
first in this
monochrome version:


And later
in color:

The Fight by Art Price.

Marion Verborg, 2010-2011 N.E.A. Fellow at the Conservation Center for Art and Historic Artifacts, treated the first version, a study done with washes of transparent black watercolor and opaque white gouache.  This one needed lots of care.  The paper was torn in several places and area along the top edge was severely weakened by
Back of paper, before treatment.
creases.  Marion worked to flatten the upper areas of the paper by applications of ethanol and weights, as well as to strengthen it with many strips of Japanese paper* applied to the paper with wheat starch paste.  A final episode of humidification and flattening returned the artwork to good form at last.

Back of paper, after treatment.
From the front, the difference isn’t that visible (it’s much more apparent from the back) but the strengthened paper should significantly contribute to the long-term preservation of the piece.

* Usually made of kozo fibers, Japanese paper is known for its extremely long fibers that are both flexible and strong, making it ideal for a conservator to use for mending losses and tears.


The Fight by Art Price, before treatment.

The Fight by Art Price, after treatment.

© 2011 Lee Price

Tuesday, August 9, 2011

A Fabric Study, Before and After

The treatments are finished!  This is the second in a 12-part series on selected conservation treatments of artwork and photographs.  "Preserving a Family Collection" concludes on August 31.

Detail of the fabric study by June Anderson.

Detail of the fabric study.
My mother did this study of four curtain fabrics while studying at Traphagen School of Fashion, 1948-1950.  She received a B+ on it, but frankly I think it looks like better than B+ work!

Marion Verborg, 2010-2011 N.E.A. Fellow at the Conservation Center for Art and Historic Artifacts, performed the beautiful conservation treatment on this piece.  She surface cleaned it, mended the separating paper, reduced a stain, reinforced the delaminated corners, humidified and flattened it.

With a piece like this, the conservator’s first concern is to ensure that the treatment will not cause
any damage to the actual artwork.  This
Detail of the fabric study.
particular study was done with a variety of color inks and watercolor.  Since much of a conservator’s work involves use of humidity, it’s imperative to first determine if the colors will run or bleed when moistened.  When inks are involved, each color needs to be tested.  Marion tested the blacks, greys, and greens on this piece, ensuring that it would be safe to move ahead with proposed treatments that included humidification and stain removal.  The testing showed no water sensitivity, meaning that everything could proceed as planned.

Originally, my mother had placed a piece of tissue paper over the artwork, attaching it to the top of the board with a paper clip.  Paper clips don’t age well
and can be nasty to paper, leaving dents and
stains.  In this case, the tracing paper took most of the rust stain, leaving only a small stain and dent near the top of the board.  Marion removed the paper clip and reduced the stain with a cotton swab and calcium-enriched deionized water.

Everything I give to the conservator gets returned.  When the treatment was completed, I received a beautiful fabric study (looks like new!) and a rusty paper clip safely removed to a plastic bag.  I’m not keeping the paper clip – the artwork is great but I attach no sentimental value to old paper clips.


Fabric study by June Anderson, before treatment.

Fabric study by June Anderson, after treatment.
© 2011 Lee Price

Monday, August 8, 2011

Letter and Envelope, Before and After


The treatments are done!

Ten months ago, I brought in over a dozen representative items from our family collection for conservation treatment at the Conservation Center for Art and Historic Artifacts.  Most of the work was completed months ago, but I’ve postponed picking them up until now – in part because I wanted these pieces to serve as a climax to this limited-duration blog.  For the next three weeks, we’ll be taking a close look at these items and discussing the work with the conservators who worked on them

First up is one of the courtship letters that my mother wrote to my father when she was going to fashion design school in Manhattan and he was working as a grocery store clerk in Southampton, Long Island.  The letter is from October 5, 1949.

As with all the “June and Art” letters, we found them folded in their original envelopes.  In preparing the June and Art blog, I removed the letters from the envelopes, unfolded them, and stored them in plastic sleeves kept in a three-ring binder.  For the Conservation Center accession, I brought in one of these sleeves, containing a single letter and an envelope with two stamps – one clearly affixed and one hanging onto a corner of the envelope.

Paper conservator
Marion Verborg.
When Marion Verborg, the 2010-2011 N.E.A. Fellow at the Conservation Center, began the treatment, she took care of that strange stamp first.  Closer examination of the situation revealed that the stamp must have fallen off another envelope and subsequently adhered to this one by its residual adhesive.  It didn’t really belong with this letter-envelope set at all.  Marion used a wet cotton swab to humidify the stamp which softens the adhesive making it possible to carefully separate the stamp from the envelope with a spatula.

The letter is beautifully flat now.  The original creases – 60 years in the making! – are barely visible anymore.  This result was achieved through humidification and flattening.  After testing the inks to make sure they wouldn’t bleed when exposed to humidity,
Marion placed the letter into a “Gore-Tex sandwich” composed of:

Gore-Tex
Pellon*
The Letter
Pellon
Gore-Tex

The Gore-Tex is sprayed with calcium-enriched deionized water on its felt-like face and the absorbed water smoothly humidifies the object (the letter, in this case).  After humidification, the object is quickly transferred into a flattening sandwich (Blotter, Pellon, The Letter, Pellon, Blotter) under Plexiglas and weights to restore the planarity (the original flatness of the paper).

Five days later, the result is a VERY flat letter, looking much like it would have when my mother wrote it in her Manhattan apartment 62 years ago.


Letter and envelope, before treatment (BT).
Letter and envelope, after treatment (AT).

* Pellon:  Product name for a non-woven polyester web.

© 2011 Lee Price

Friday, August 5, 2011

Abrasions, Flaking Paint, and Pinpoint Losses


An oil painting of a harvest scene by Art Price.
This is one of my favorite paintings by my father:

Unfortunately, it’s in poor condition.  Susan Blakney, painting conservator and owner of West Lake Conservators, didn’t mince words during her examination.  “The abrasion goes into the ground, exposing it,” she said.

And it’s not just the large areas where no paint is left that present concerns.  The paint is flaking in many other places, too.  “It will continue to flake unless treated,” Susan warned.  “These areas need to be consolidated with an appropriate adhesive to stop the flaking.  I’d want to use a consolident on the areas that appear erupted to stabilize the deterioration.  Once the consolident is applied, a heated spatula could be used on any lifted paint to return it to plane.”  She added that in areas of pinpoint losses, she could in-paint to match the surrounding colors using watercolor brushes with very fine tips.

Painting conservator Susan Blakney
with the painting.
I’d love to see this painting returned to a semblance of its original appearance.  But I also realize this would require a considerable amount of in-painting.  Susan explained how a conservator approaches this type of challenging situation.  “For appropriate inpainting of a sizable loss,” she said, “it helps to become familiar with the artist’s work and techniques.  If absolutely necessary, you might base it on a single painting, but it’s far better to see a range of work.  Inpainting is done to replace missing portions of a puzzle by simulating the artist’s style.”  As for this painting:  “It would take some imagination to inpaint this because of the significant losses.”

Conservators are careful to make their inpainting work reversible, by using stable synthetic materials.   They may use a varnish as a base layer and/or special paints that can be removed with mild solvents such as mineral spirits.  This approach restores a painting to its original appearance while leaving the door open for future treatments.  As the field of art conservation continues to advance, new techniques will likely develop that could prompt a new treatment approach for the painting.  Or I could come across a photograph of the painting that clearly depicts the original details on areas that have been lost through abrasion.  There’s nothing unusual about revisiting a conservation treatment.  Frequently, paintings in museums have been through many.

It’s my hope that this severely abraded painting has reached its lowest point, preservation-wise.  It deserves an investment in care, quality storage, and professional attention.


Special thanks to Susan Blakney for generously sharing her painting conservation expertise during the past two weeks!

© 2011 Lee Price

Wednesday, August 3, 2011

The Uses of Varnish

Painting conservator Susan Blakney examines an oil painting
by Art Price.

I love it when conservation information is included at art museum exhibits.  Typically, you see a vibrant and beautiful image on the canvas and then to the right is a digital image that shows how dark the painting looked before treatment.  The label explains how the conservator painstakingly removed layer after layer of varnish to find the original colors hiding beneath.

And I’ve wondered:  Why’d people put on all that varnish in the first place?

Susan Blakney with an oil painting
by Art Price.
Well, first of all, it protects the painting.  Susan Blakney, painting conservator and owner of West Lake Conservators, carefully examined my father’s paintings to determine his approach to varnishing.  The first painting, the landscape of Noyac, showed no sign of varnish.  “Varnish would have helped,” she said.  “It would have provided a layer to protect the paint layer from grime.  Then when you remove the grime it would not have penetrated the paint. Grime is one of the many enemies that a painting conservator confronts on a daily basis.  And lots of grime can accumulate on a painting over the years.  It firmly attaches to some paint layers making cleaning very difficult to remove without specific formulations developed through a sequence of testing.”  As Susan asked me, “Can you imagine a window in a home that hasn’t been cleaned in 60 years?  Well, that’s the amount of grime on this painting.”

Apparently, all that darkening on varnished paintings that I noted at the beginning isn’t entirely the effect of the aging varnish.  It’s the grime, too.  “Paintings can lose the illusion of depth perspective because of grime,” Susan said.  “With cleaning, the lights get lighter and the darks get darker.  A disfigured painting for whatever reason alters our perception of its beauty and the artist’s talent.”

Susan noted that you can’t safely form an opinion on an artist’s use of varnish by looking at just one painting.  Sure enough, the second painting she looked at suggested that my father may have used a different artistic approach on this one (a harvest scene).  “Artists have all different opinions about varnish.  Some cover all their paintings, some never use it, and some use varnish in selective areas but not others.”  This second painting looked like it might fall into that third category – partially varnished.  Furthermore, some artists  may have different approaches according to the subject or the medium of the particular painting.

Susan Blakney examines an oil painting
of a harvest scene by Art Price.
Since Susan was conducting this examination in a hotel conference room, she lacked the equipment to firmly identify the presence of varnish on the second painting.  Conservators normally use ultraviolet light to detect varnish.  According to Susan, “If the painting fluoresces cloudy in ultraviolet light, it’s a sign of varnish or possibly an intentional glaze – perhaps a varnish-like medium with or without the addition of a clear pigment to deepen a passage or color.”

Conservators often use varnish as an isolating layer or base for their in-painting of losses.  Stable synthetic varnish makes an ideal base layer for this work because it can be easily removed at a later date without damage to the original painting beneath.  This is important because one of the cardinal rules of art conservation is to ensure that all materials used in treatments are reversible.  Varnish is sometimes applied by the artist himself or someone in a maintenance situation after a painting has hung for some time collecting a grime layer. The older the painting the more likely it is that there will be multiple layers of grime and varnish.  In order to freshen a painting’s appearance, an owner may even apply the varnish improperly while the painting is still in the frame, potentially leaving the painting firmly stuck to the frame.  The end result can be layer upon layer of varnish alternating with grime – and a painting that looks decidedly murkier than when it was originally painted.

Painting conservators who examine these layers of varnish and grime must determine the layer structure and decide which they want to remove.  Different resins with different solubility parameters may have been used. According to Susan, “We don’t usually attempt to remove grime and varnish at once although at times it is possible and desired.  We often use different formulations for each layer. Cleaning may be the most irreversible and dangerous part of the treatment if done improperly.  Unfortunately, the paint can be dissolved and/or abraded, which we call skimming. Some commercially available cleaning solutions can leave a very unevenly cleaned surface which is one of the most difficult tasks a conservator can encounter.  There is also the risk that glazes can be stripped off.  I never recommend that owners attempt to clean the paintings themselves. It took me years to develop the necessary skills.”

© 2011 Lee Price